Introduction
The following documentation is your guide to the new theme. Since this is a Ghost theme documentation, it is assumed that you have a basic knowledge of the Ghost app.
If you’re just starting out with Ghost, it is best to see the guides in the official Ghost Help Center – check this out and you’ll have all the information that is available.
Uploading a theme
This is where the magic happens! You are able to upload, activate and delete a theme in the Ghost Admin of your publication.
Step-by-Step
- To upload a theme, go to the Design settings in the Ghost Admin and click Change theme in the bottom left corner.
- Then click the Upload theme button in the upper right corner.
- Once uploaded, click Activate to activate the theme on your site.
Tip: After uploading the theme my settings in Design section were reset, what should I do?
The best solution is to always use the same name e.g. theme-name.zip – that way you will not have to enter your settings again after uploading a theme.
Ghost assigns the settings in the Design section to the name of the uploaded archive. If you uploadtheme-v1.zipandtheme-v2.zip– Ghost will recognize them as two different themes – so the settings will reset.
Editing a theme
In many places in the following documentation you will encounter information about editing theme files. To edit files, you will need to unzip the theme archive – at this point you will have access to the necessary files indicated in the theme documentation.
Step-by-Step
- To edit your theme files, download a copy of the theme. For this purpose go to the Design settings in the Ghost Admin and click Change theme in the bottom left corner.
- Use the Advanced dropdown menu in the upper right corner to download your theme, then unzip the theme locally.
- Once the theme is unzipped, the files can be edited using an code editor – make the changes indicated in the theme documentation.
You can edit files using applications (code editor) such as Sublime Text, Visual Studio Code or Brackets. Using native text editors like TextEdit on macOS may add formatting may cause the theme to work incorrectly.
- When you’ve finished making changes to the theme code, re-zip the theme directory for uploading back to Ghost.
To create a zip archive on a macOS, right-click on the theme folder to view the context menu. Then, click the Compress option. On Windows right-click on the theme folder, select Send to, and then select Compressed (zipped) folder.
- To upload a theme, go to the Design settings in the Ghost Admin and click Change theme in the bottom left corner.
- Then click the Upload theme button in the upper right corner.
- Once uploaded, click Activate to activate the theme on your site.
Updating a theme
Updates to the theme ensure compatibility with the latest Ghost version, performance improvements and minor bug fixes. So it is important that you use the latest available theme version.
If your theme features custom code, updating it with the latest versions will overwrite all your customizations.
Step-by-Step
- Download the latest version of the theme from Themeforest, then unzip the archive locally.
- Choose a theme version that is compatible with your Ghost version.
- To upload a theme, go to the Design settings in the Ghost Admin and click Change theme in the bottom left corner.
- Then click the Upload theme button in the upper right corner.
- Once uploaded, click Activate to activate the theme on your site.
Tip: What if you’ve already edited the theme, and want to update it without losing your changes?
That’s a bit trickier to deal with but not impossible, as long as you can remember what the changes were, or more specifically which files you edited. Unfortunately in Ghost when updating a theme you have to re-enter your changes.
For more advanced users, it can be helpful to use a comparing files app like Sublime Merge – that way you can find your changes if you don’t remember them.
Tip: After uploading the theme my settings in Design section were reset, what should I do?
The best solution is to always use the same name e.g. theme-name.zip – that way you will not have to enter your settings again after uploading a theme.
Ghost assigns the settings in the Design section to the name of the uploaded archive. If you uploadtheme-v1.zipandtheme-v2.zip– Ghost will recognize them as two different themes – so the settings will reset.
Uploading a logo
A publication logo is the primary logo for your brand and is displayed across your theme.
Step-by-Step
- To upload a logo, go to the Design settings in the Ghost Admin.
- On the left you’ll see the option Brand – expand this settings list and go to the Publication logo position.
- Click Upload logo to upload your logo.
- Finally, click Save to activate.
Tip: How to change logo size?
- To change logo size go to the Code injection settings in the Ghost Admin and paste this code to the Site header:
<style>
:root {
   --max-height-logo: 35px;
}
</style>- Change the current value to the expected value.
- Finally, click Save to activate.
Uploading a cover image
A publication cover is an optional large background image that can be used with your publication.
Step-by-Step
- To upload a publication cover, go to the Design settings in the Ghost Admin.
- On the left you’ll see the option Brand – expand this settings list and go to the Publication cover position.
- Click Upload cover to upload your image.
- Finally, click Save to activate.
Formspree
Formspree is a service that hosts forms so that you can gather content from your visitors. Get email notifications of every submission.
Step 1: Add your Formspree endpoint
- Go to the Design settings in the Ghost Admin.
- On the left you’ll see the option Site-wide – expand this settings list and go to the Contact form endpoint position.
- Paste your Formspree endpoint, e.g.
https://formspree.io/f/xhyplkej - Finally, click Save to activate.
Step 2: Add a contact page
- Create a new page, add a Page title, and open the Page settings panel using the icon in the top right of the screen.
- At the bottom of the panel you’ll see a dropdown menu titled Template.
- Use the dropdown to select the Contact template, close the panel.
- Click Publish.
Tip: Adding page to the navigation
If you want this page to appear in the main navigation of your site, just add it to the Navigation list in your site settings.
Getform
Getform is a form backend platform that lets you handle your forms on your websites. You can set up a form and start collecting submissions to your form within minutes.
Step 1: Add your Getform endpoint
- Go to the Design settings in the Ghost Admin.
- On the left you’ll see the option Site-wide – expand this settings list and go to the Contact form endpoint position.
- Paste your Getform endpoint, e.g.
https://getform.io/f/3fc0b738-4221-415e-8288-zf62f84aff50 - Finally, click Save to activate.
Step 2: Add a contact page
- Create a new page, add a Page title, and open the Page settings panel using the icon in the top right of the screen.
- At the bottom of the panel you’ll see a dropdown menu titled Template.
- Use the dropdown to select the Contact template, close the panel.
- Click Publish.
Tip: Adding page to the navigation
If you want this page to appear in the main navigation of your site, just add it to the Navigation list in your site settings.
Disqus
Disqus is a commenting platform that lets you communicate directly with your readers. The theme integrates with Disqus so you can collect user’s feedback on your articles.
Step-by-Step
- Go to the Design settings in the Ghost Admin.
- On the left you’ll see the option Post – expand this settings list and go to the Disqus shortname position.
- Paste your Disqus shortname, e.g. copy only
your-sitefromyour-site.disqus.com - Finally, click Save to activate.
Members feature
The Members feature allows you to turn any site into a membership business with member signup, paid subscriptions and email newsletters.
The members feature is enabled by default. However, you need to upload routes.yaml file avoid the 404 error.
Step-by-Step
- Unzip the theme archive on your computer and locate the file called
routes.yaml. - Go to the Labs settings in the Ghost Admin and scroll down until you see the Routes section.
- Upload the
routes.yamlfrom this theme. - Create an account page
Comments
The native comments feature in Ghost allows you to invite members to join the discussion and participate in a community directly on your website.
Step-by-Step
- To enable native comments, go to the Membership settings in the Ghost Admin.
- Change the Commenting level to All members or Paid-members only.
- Finally, click Save to activate.
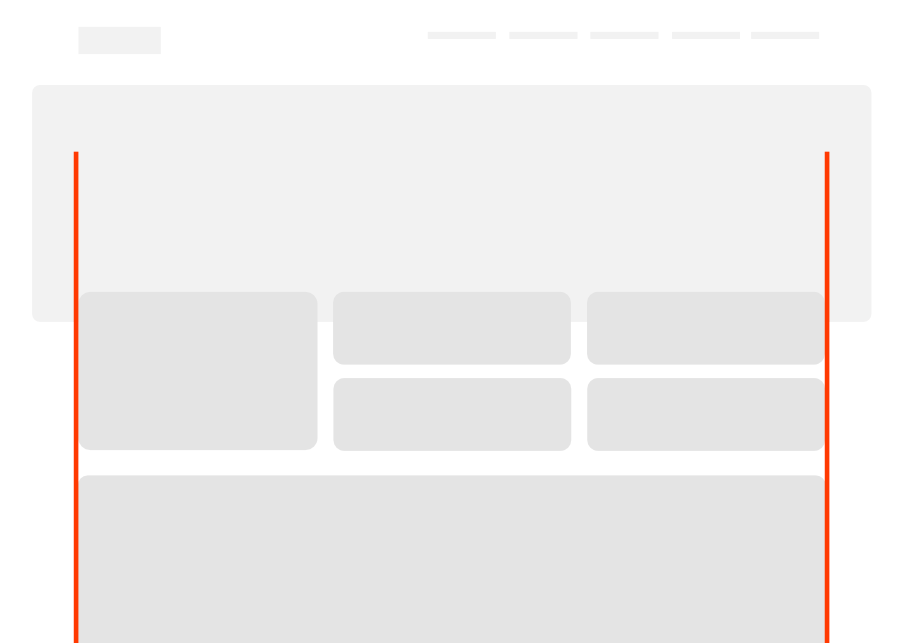
Pinned section
Select which posts or pages you want to appear at the top of your site in the pinned section.
Step-by-Step
- Open the post you would like to add to the pinned section.
- Then, go to the Post/Page settings panel using the icon in the top right of the screen.
- At the bottom of the panel, you’ll see a checkbox titled Feature this post/page.
- Click on the checkbox, close the panel.
Order of pinned posts
To allow setting the order, posts and pages are sorted with the date of the update. The post last marked as featured will be set first in pinned section. If you have published both, featured posts and pages – pages will always be displayed before posts.
Possible layouts of pinned section
The theme supports pinned posts for up to eight posts and two pages and one 'hero' post at a time, all of which are responsively optimised and organised to look their best.
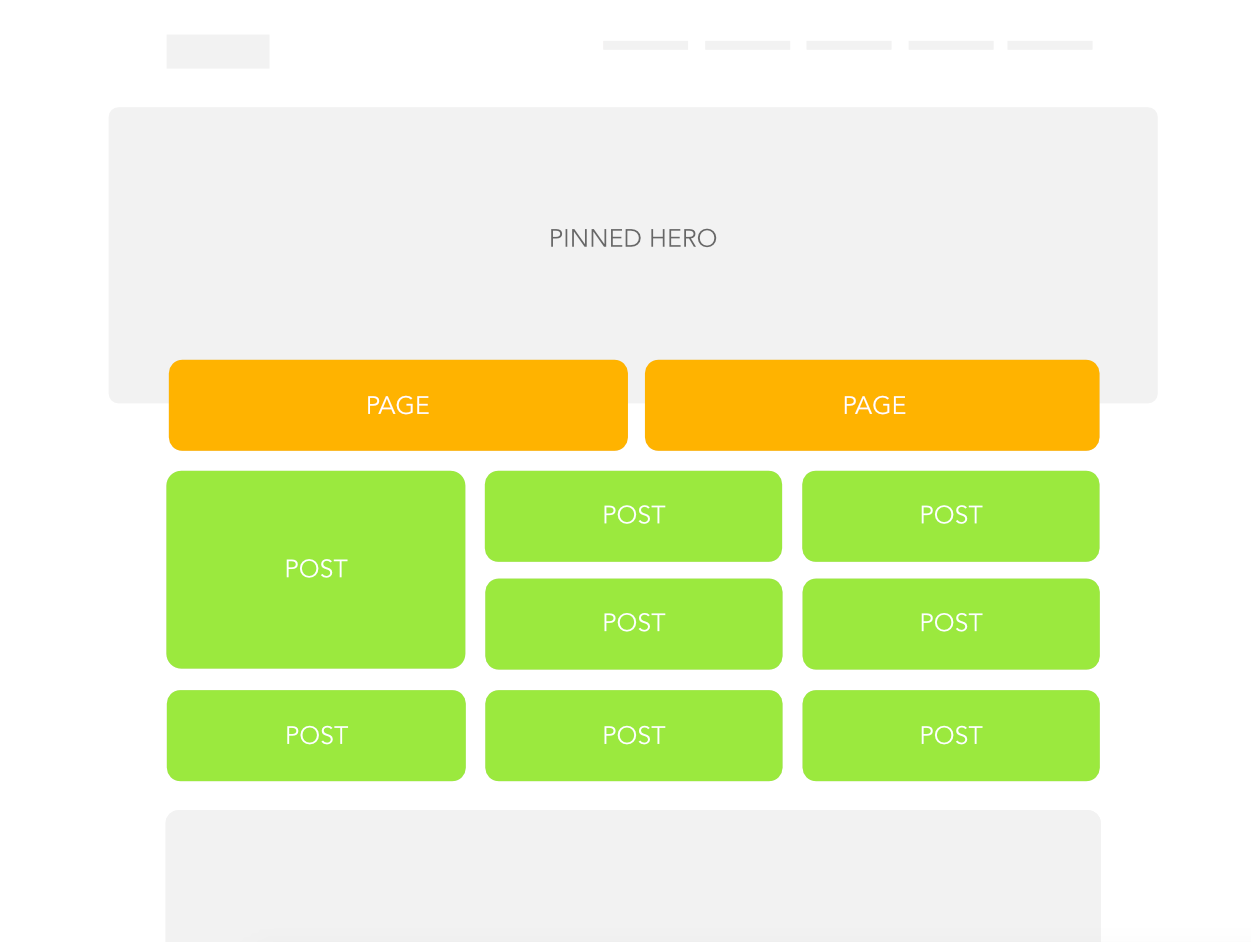
Tip: How to set pinned 'hero' post?
- To set pinned 'hero' post, just add an internal tag
#pinned-hero(tags which are prefixed by a#character, are internal tags within Ghost) in Post settings panel to the published post. You can only have one pinned 'hero' post.
This will also align the pinned section to the posts section.
- The tag slug should be
hash-pinned-hero
Tip: How to remove featured posts from the main collection?
- Go to the Labs settings in the Ghost Admin and scroll down until you see the Routes section.
- Upload the
routes.yamlfile with these settings:
routes:
  /signup/: members/signup
  /signin/: members/signin

collections:
  /:
    permalink: /{slug}/
    filter: featured:false
    template: index
  /featured/:
    permalink: /featured/{slug}/
    filter: featured:true
    template: index

taxonomies:
  tag: /tag/{slug}/
author: /author/{slug}//featured/ URL address for all posts that has been marked as featured. This change is required to remove those posts from the main collection.The most important thing to know when working with .yaml is that it uses indentation to denote structure. That means the only type of nesting which works is 2 spaces. The most common reason for .yaml files not working is when you accidentally use the wrong type or quantity of spacing for indentation.
Dark version
The dark version introduces a new look for your site.
Step-by-Step
- Go to the Design settings in the Ghost Admin.
- On the left you’ll see the option Site-wide – expand this settings list and go to the Color scheme position.
- Use the dropdown menu to select the Dark option.
- Finally, click Save to activate.
Tip: Dark version depending on operating system preferences
Modern operating systems (Windows, macOS, iOS, etc.) allow users to choose their preference for light or dark system themes. The below feature is used to detect if the user has requested the system to use a light or dark color theme.
- To activate an auto dark version based on user operating system preferences, go to the Design settings in the Ghost Admin.
- On the left you’ll see the option Site-wide – expand this settings list and go to the Color scheme position.
- Use the dropdown menu to select the Auto option.
- Finally, click Save to activate.
Color label
The color label, is an optional graphic element on the left side of your site in post view.
Step-by-Step
- To activate the Color label of your site, go to the Design settings in the Ghost Admin.
- On the left you’ll see the option Post – expand this settings list and go to the Color label on the left side position.
- Use the switch to activate the option.
- Finally, click Save to activate.
Search function
By default, the theme uses a native search option. You can also use the search function specially designed for this theme — to do this, you must set the Content API key.
Step 1: Generating Content API key
- To generate Content API key, go to the Integrations settings in the Ghost Admin.
- Click Add custom integration, then give the new integration a name, like 'Search', and click the Create button.
- Copy your Content API key and click Save.
Step 2: Activate the search function
- Go to the Design settings in the Ghost Admin.
- On the left you’ll see the option Site-wide – expand this settings list and go to the Content API key for search position.
- Paste your Content API key.
- Finally, click Save to activate.
Authors page
To present all authors from your publication in an elegant way, you can add a custom authors page.
Step-by-Step
- Create a new page, add a Page title, and open the Page settings panel using the icon in the top right of the screen.
- At the bottom of the panel you’ll see a dropdown menu titled Template.
- Use the dropdown menu to select the Authors template, close the panel.
- Finally, click Publish.
Tip: Adding page to the navigation
If you want this page to appear in the main navigation of your site, just add it to the Navigation list in your site settings.
Tags page
To present all tags from your publication in an elegant way, you can add a custom tags page.
Step-by-Step
- Create a new page, add a Page title, and open the Page settings panel using the icon in the top right of the screen.
- At the bottom of the panel you’ll see a dropdown menu titled Template.
- Use the dropdown menu to select the Tags template, close the panel.
- Finally, click Publish.
Tip: Adding page to the navigation
If you want this page to appear in the main navigation of your site, just add it to the Navigation list in your site settings.
Contact page
If you wish to have a direct way in which your readers can contact you, you can add a contact page based on Formspree or Getform.
Step-by-Step
- Configure the Formspree or Getform service.
- Create a new page, add a Page title, and open the Page settings panel using the icon in the top right of the screen.
- At the bottom of the panel you’ll see a dropdown menu titled Template.
- Use the dropdown menu to select the Contact template, close the panel.
- Finally, click Publish.
Tip: Adding page to the navigation
If you want this page to appear in the main navigation of your site, just add it to the Navigation list in your site settings.
Responsive tables
The responsive table will display a horizontal scroll bar if the screen is too small to display the full content. The following description applies to the table added using the markdown card.
By default, the table adapts to the window width. If you have a table that is too wide, you can add a container <div class="responsive-table"> element with around the table, and it will display a horizontal scroll bar when needed.Step-by-Step
- To add a responsive table, use the Markdown card.
- Add a container
<div class="responsive-table">element with around the table (in markdown there always needs to be a blank line between anyHTMLandmarkdown).
<div class="responsive-table">

| # | Heading | Heading | Heading | Heading | Heading |
|:--|:--------|:--------|:--------|:--------|:--------|
| 1 | Cell    | Cell    | Cell    | Cell    | Cell    |
| 2 | Cell    | Cell    | Cell    | Cell    | Cell    |
| 3 | Cell    | Cell    | Cell    | Cell    | Cell    |

</div>- and optional colons : for forcing column alignment.Tip: What it takes to generate a table?
To generate a table, you can use the tool Markdown Tables Generator
Create members pages
The members feature allows you to turn any site into a membership business with member signup, paid subscriptions and email newsletters.
The members feature is enabled by default. However, you need to upload routes.yaml file avoid the 404 error.
Step-by-Step
- Unzip the theme archive on your computer and locate the file called
routes.yaml. - Go to the Labs settings in the Ghost Admin and scroll down until you see the Routes section.
- Upload the
routes.yamlfrom this theme. - Create an account page
Disable members feature
If you don’t want to use the members feature in Ghost and don’t want to ask visitors to subscribe newsletter, sign up or sign in, you can quickly disable this feature from the settings in Ghost Admin.
Step-by-Step
- To disable members feature, go to the Membership settings in the Ghost Admin.
- Change the Subscription access level to Nobody.
This will disable Portal and prevent any visitors from being able to subscribe or sign in to your site. It will also remove the subscription and sign-up or sign-in elements from the theme.
- Click Save to activate.
Login panel
The login panel is a navigation component that shows 'Sign in / Sign up' buttons when a member is logged out, and 'Account / Sign out' buttons when a member is logged in.
Tip: Replacing 'Sign up' with 'Membership'
- You can easily replace the 'Sign up' page with 'Membership', for this purpose open
../partials/members/login_panel.hbsfile in your code editor and find:
<a class="members-signup" href="{{@site.url}}/signup/">{{t "Sign up"}}</a>- Then, replace with:
<a class="members-signup" href="{{@site.url}}/membership/">Membership</a>- Save your
login_panel.hbsfile in../partials/members/folder.
Tip: How to remove the login panel?
- You’ll need to open the theme’s
../partials/header.hbsfile in your code editor. - You need to remove
{{>members/login_panel}}partial reference. - Save your
header.hbsfile in../partials/folder.
Account page
The account page shows your members the type of account they’re having and gives them some subscription specific data.
Step-by-Step
- Create a new page called Account and open the Page settings panel using the icon in the top right of the screen.
- At the bottom of the panel you’ll see a dropdown menu titled Template.
- Use the dropdown menu to select the Account template, close the panel.
- Finally, click Publish.
- The Page URL should be
/account/
Membership page
The membership page is helping your visitors to quickly visualize and compare the different pricing plans you offer.
Step-by-Step
- Create a new page, add a Page title, and open the Page settings panel using the icon in the top right of the screen.
- At the bottom of the panel you’ll see a dropdown menu titled Template.
- Use the dropdown menu to select the Membership template, close the panel.
- Finally, click Publish.
Tip: How to add premium tier?
- Go to the Membership settings in the Ghost Admin.
- At the bottom you’ll see the option Membership tiers.
- If you have Stripe connected expand Premium position and click +Add tier – add your own tier name, description, monthly and yearly prices and list of benefits.
- Click Add tier to activate.
- Making tiers available to visitors – from the Portal settings, you can control which tiers appear on your site.
Tip: How to add description and list of benefits to free tier?
- Go to the Membership settings in the Ghost Admin.
- At the bottom you’ll see the option Membership tiers.
- Expand Free position and add your tier description and list of benefits.
- Finally, click Save to activate.
Tip: How to add your own color to pricing cards?
- To add your own color, go to the Code injection settings in the Ghost Admin.
- Then, paste this code to the Site header:
<style>
.free-tier {
   --color-bg-membership-card-free: #a7fb93;
}
.paid-tier-1 {
   --color-bg-membership-card-paid: #fed672;
}
.paid-tier-2 {
   --color-bg-membership-card-paid: #eebeff;
}
</style>- Change the value of the hexadecimal color to your own color.
- Finally, click Save to activate.
Tip: Adding page to the navigation
If you want this page to appear in the main navigation of your site, just add it to the Navigation list in your site settings.
Newsletter page
The newsletter page is allowing your visitors to sign up to your site in order to access members only content and/or receive the premium newsletter. It depend on you how you’re going to use this page.
Step-by-Step
- Create a new page, add a Page title, and open the Page settings panel using the icon in the top right of the screen.
- At the bottom of the panel you’ll see a dropdown menu titled Template.
- Use the dropdown menu to select the Newsletter template, close the panel.
- Finally, click Publish.
Tip: Adding page to the navigation
If you want this page to appear in the main navigation of your site, just add it to the Navigation list in your site settings.
Subscription form
The subscription form is placed at the bottom of the homepage and posts.
Tip: How to remove the subscription form?
- You’ll need to open the theme’s
default.hbsfile in your code editor. - You need to remove
{{>members/subscribe_form}}partial reference. - Save your
default.hbsfile in root folder.
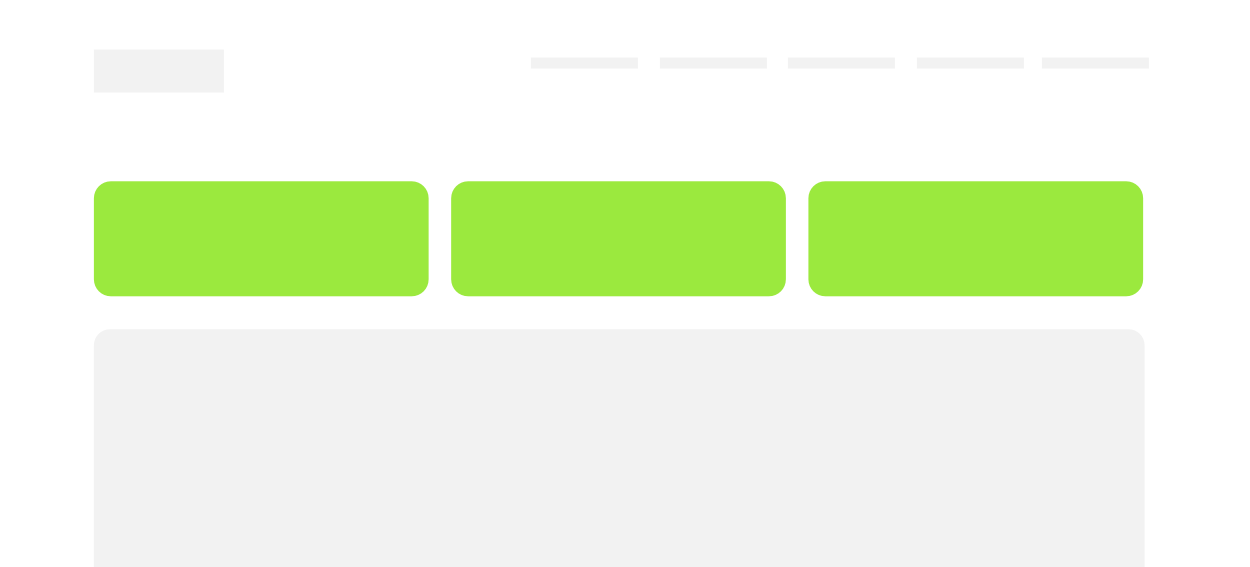
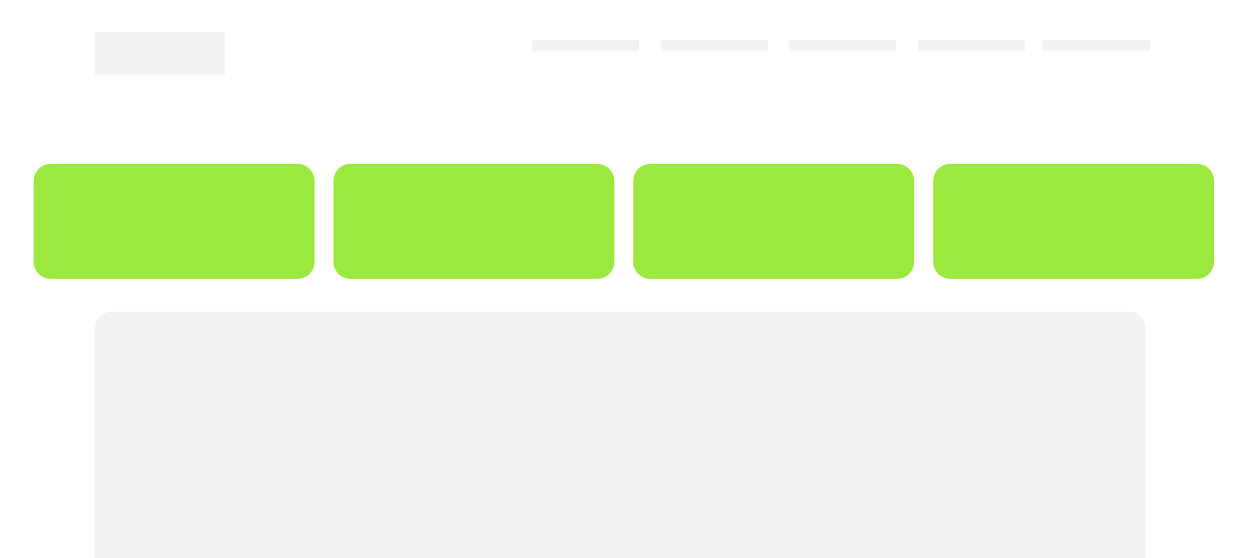
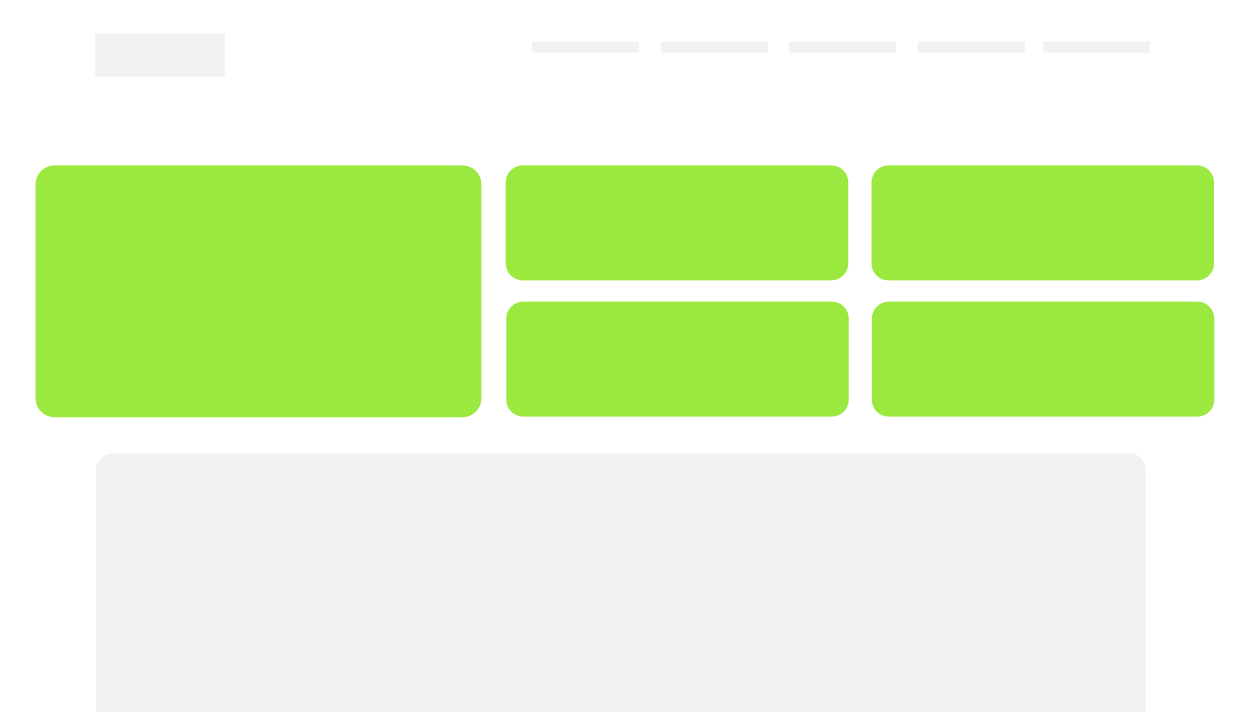
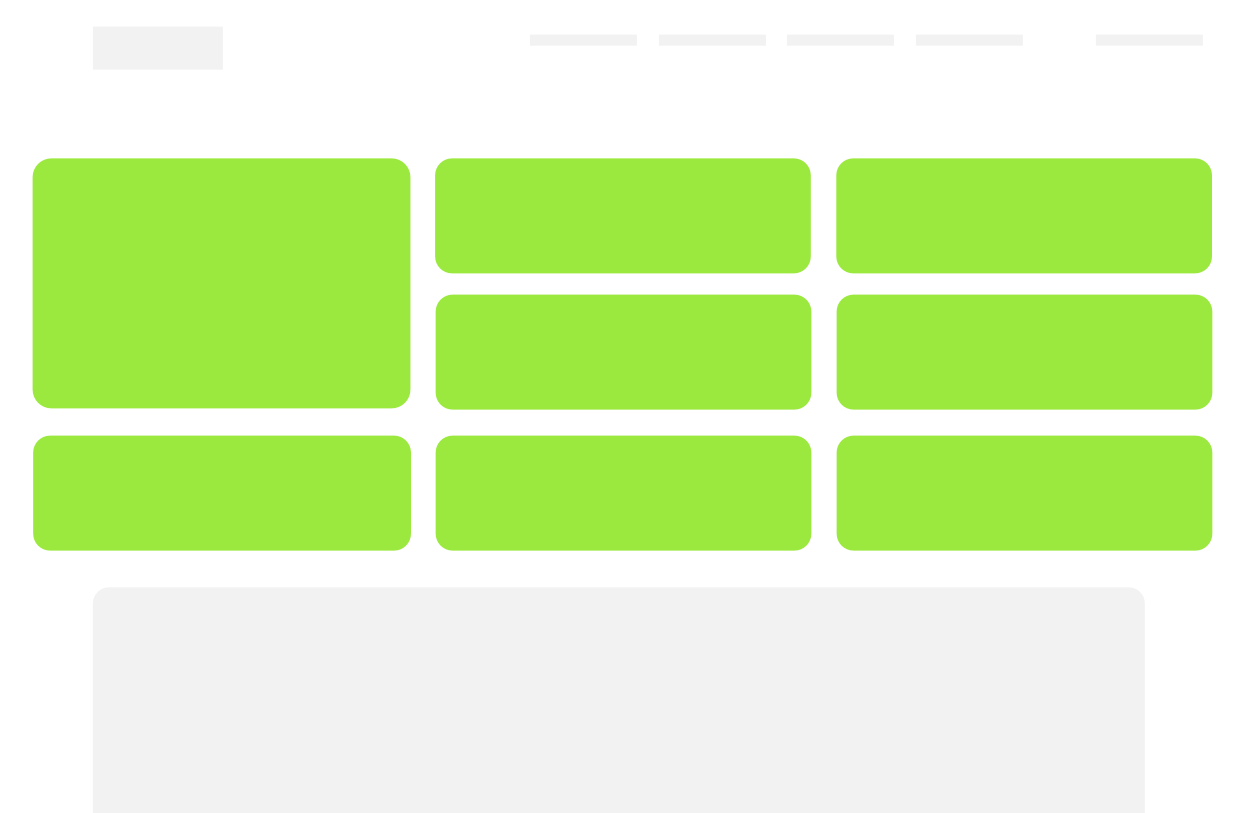
Layouts
The theme has four possible layouts.
See also related section: Pinned section.
Step-by-Step
- To change the layout of your site, go to the Design settings in the Ghost Admin.
- On the left you’ll see the option Homepage – expand this settings list and go to the Layout position.
- Use the dropdown menu to select one of the options: Big posts, Big posts & Grid, Grid & Big posts or Grid.
- Finally, click Save to activate.
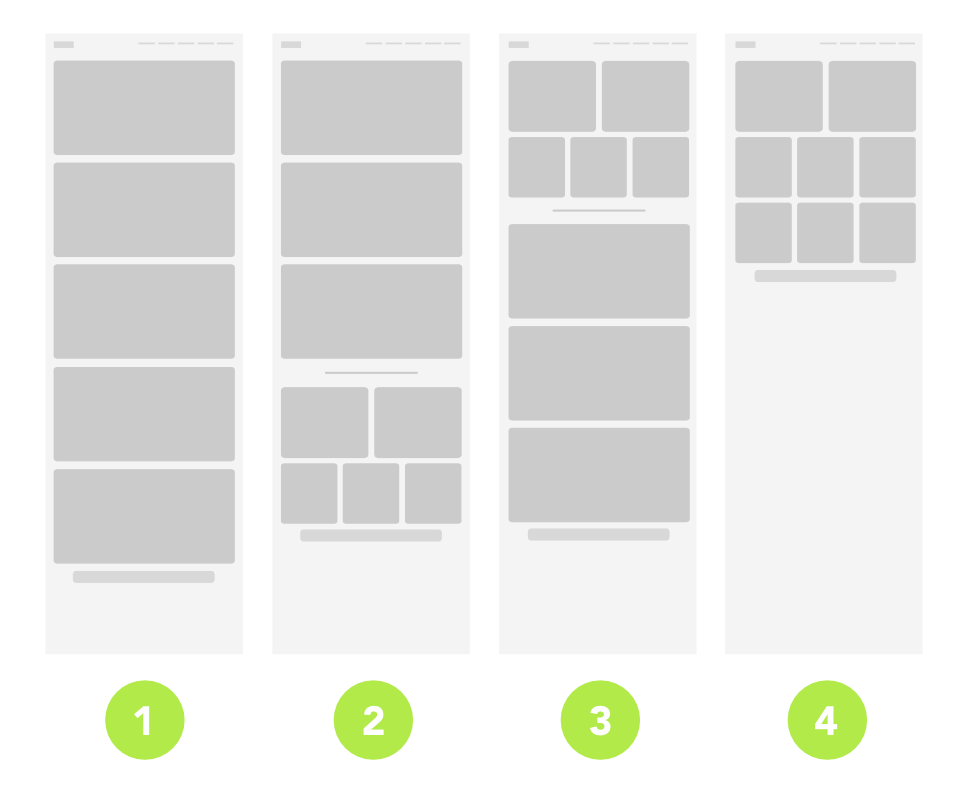
Layout 1 – this is the default option Big posts
Layout 2 – this is the option Big posts & Grid
Layout 3 – this is the option Grid & Big posts
Layout 4 – this is the option Grid
Tip: How to set two large posts in a grid layout?
Two posts take up half the space of space in the first row in grid layout. This applies to the homepage, author and tag page when the option Big posts & Grid, Grid & Big posts or Grid is active.
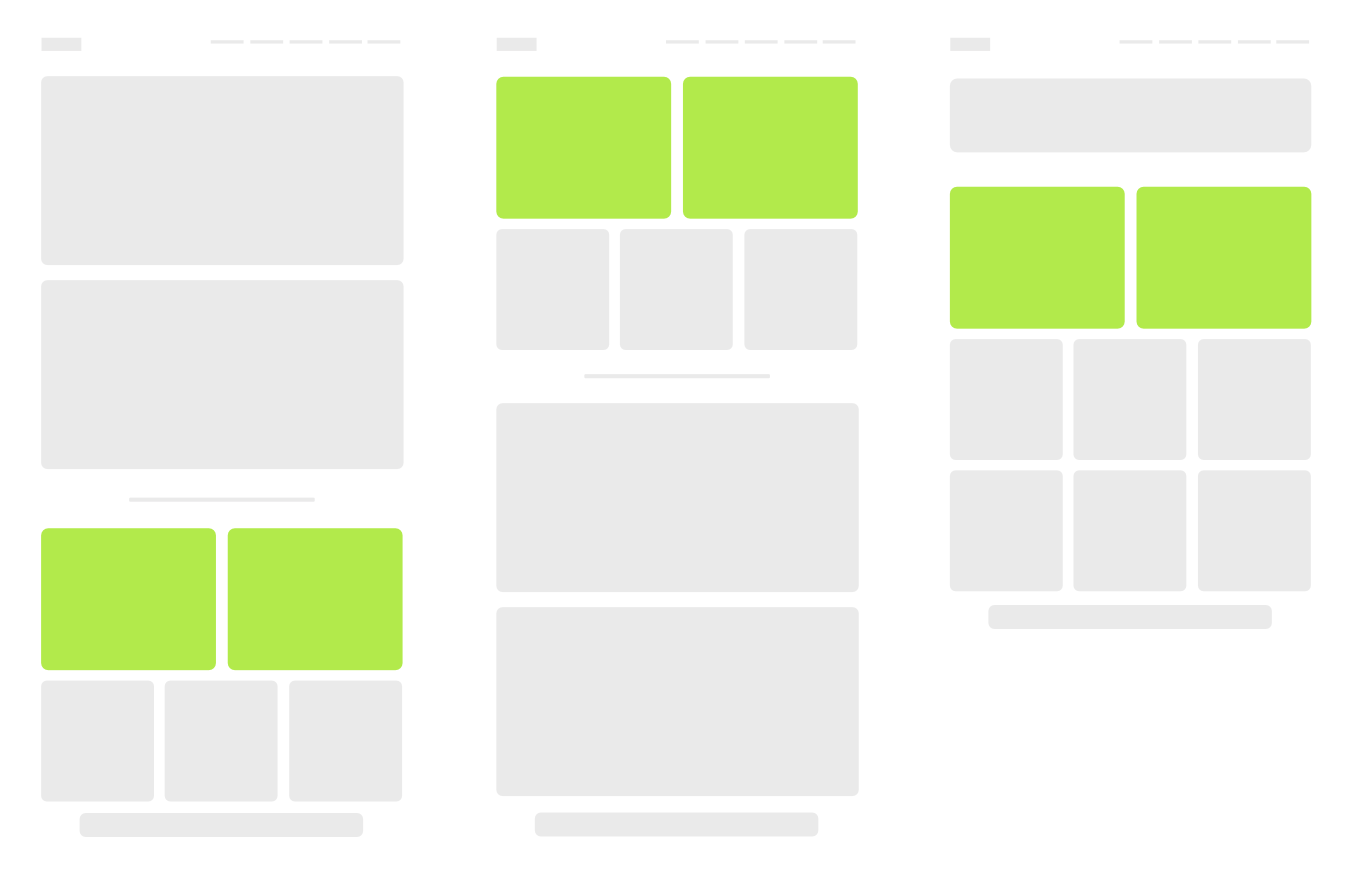
- To set two large posts, go to the Design settings in the Ghost Admin.
- On the left you’ll see the option Homepage – expand this settings list and go to the Two large posts in a grid layout position.
- Use the switch to activate the option.
- Finally, click Save to activate.
Accent color
Primary color used in your publication.
Step-by-Step
- To change the accent color in your publication, go to the Design settings in the Ghost Admin.
- On the left you’ll see the option Brand – expand this settings list and go to the Accent color position.
- Choose your color.
- Finally, click Save to activate.
Tip: How to change the text color on elements with dark Accent color?
By default, the text color is dark on elements with Accent color. If your Accent color is dark, you can change text to white.
- To activate a white text, go to the Design settings in the Ghost Admin.
- On the left you’ll see the option Site-wide – expand this settings list and go to the White text when accent color is dark position.
- Use the switch to activate the option.
- Finally, click Save to activate.
Colors of post-cards
We have added an easy way to add the color of post-cards. You can choose a color from the color palette.
Step-by-Step
- To add the color, just add an adequate internal tag in Post settings panel to the published post.
- For example, add an internal tag
#color-amber(tags which are prefixed by a#character, are internal tags within Ghost). - Click Update, to activate.
- The tag slug should be
hash-colorname, for examplehash-color-amber
Available light colors
Light colors means that the texts will be black.
Pear
#color-pear
Amber
#color-amber
Apricot
#color-apricot
Coral
#color-coral
Rose
#color-rose
Cerise
#color-cerise
Thistle
#color-thistle
Lavender
#color-lavender
Sea
#color-sea
Mint
#color-mint
Palegreen
#color-palegreen
Available dark colors
Dark colors means that the texts will be white.
Goldenrod
#color-goldenrod
Copper
#color-copper
Carmine
#color-carmine
Ruby
#color-ruby
Fuchsia
#color-fuchsia
Eggplant
#color-eggplant
Indigo
#color-indigo
Ultramarine
#color-ultramarine
Turquoise
#color-turquoise
Applegreen
#color-applegreen
Ink
#color-ink
Logo height
Follow below steps to change the size of the logo on your site by adding simple CSS code.
Step-by-Step
- To change logo size go to the Code injection settings in the Ghost Admin.
- Then, paste this code to the Site header:
<style>
:root {
   --max-height-logo: 35px;
}
</style>- Change the current value to the expected value.
- Finally, click Save to activate.
Post-cards size
We have added an easy way to change the post-cards size of the posts on your blog in home view.

#large — item takes 2/3 of spaceStep-by-Step
- To change the post-card size, just add an internal tag
#large(tags which are prefixed by a#character, are internal tags within Ghost) in Post settings panel to the published post. - Click Update, to activate.
- The tag slug should be
hash-large
Posts per page
By default, the homepage, author’s and tag’s page display a maximum of 8 posts per page, but you are able to change this number.
Step-by-Step
- You’ll need to open the theme’s
package.jsonfile in your code editor and find:
"config": {
    ...
    "posts_per_page": 8
    ...
}- Change the value of the
8to the expected value. - Save your
package.jsonfile in root folder.
Theme translation
The theme is fully translatable by enabling a publication language in the settings of the Ghost Admin. Before that, you must prepare your language file.
Step-by-Step
- Inside the
../locales/folder, add target language files for each translatable language used on your site. For examplees.jsonfor Spanish andpl.jsonfor Polish. A valid language code must be used. - Translate the sentences used in theme inside your new language files, for example, in
en.json:
{
    "Back": "Back",
    "Newer Posts": "Newer Posts",
    "Older Posts": "Older Posts",
    ...
}- And edited to translate into Spanish for
es.json:
{
    "Back": "Volver",
    "Newer Posts": "Artículos Siguientes",
    "Older Posts": "Artículos Anteriores",
    ...
}- Upload a theme with a new language file.
- Go to the General settings in the Ghost Admin.
- At the top of the page, you’ll see the Publication info section.
- Enter the correct language code into your Publication language settings menu.
- Finally, click Save to activate.
Tip: Reactivate the translation file
If you edited the active language, you have to restart Ghost to make the changes effective. Alternatively, enter another language code and click Save to activate, then switch back to your language code.
Social accounts
Enter your Facebook and Twitter account details in the 'General' settings of the Ghost Admin to enable links to your social profiles.
Step-by-Step
Tip: Adding other social accounts to the footer
../partials/footer_icons.hbsfile in your code editor.{{!--and--}}for the chosen profile icon.#for eachhrefvalue with your own profile links.footer_icons.hbsfile in../partials/folder.